Create a Debian VM template in Proxmox
Debian is a lightweight Linux distribution that is well supported and designed to be stable. However, creating a VM template is not that straight forward. In this guide I’m going to assume you have used Proxmox before and have a decent idea of how to administer Debian. Before beginning make sure you have the Debian installer iso uploaded to Proxmox.
To start, create a new VM in Proxmox.
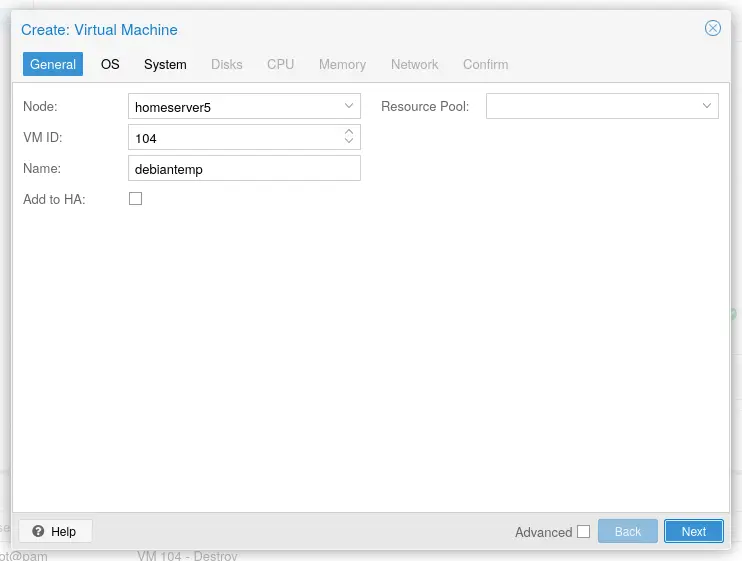
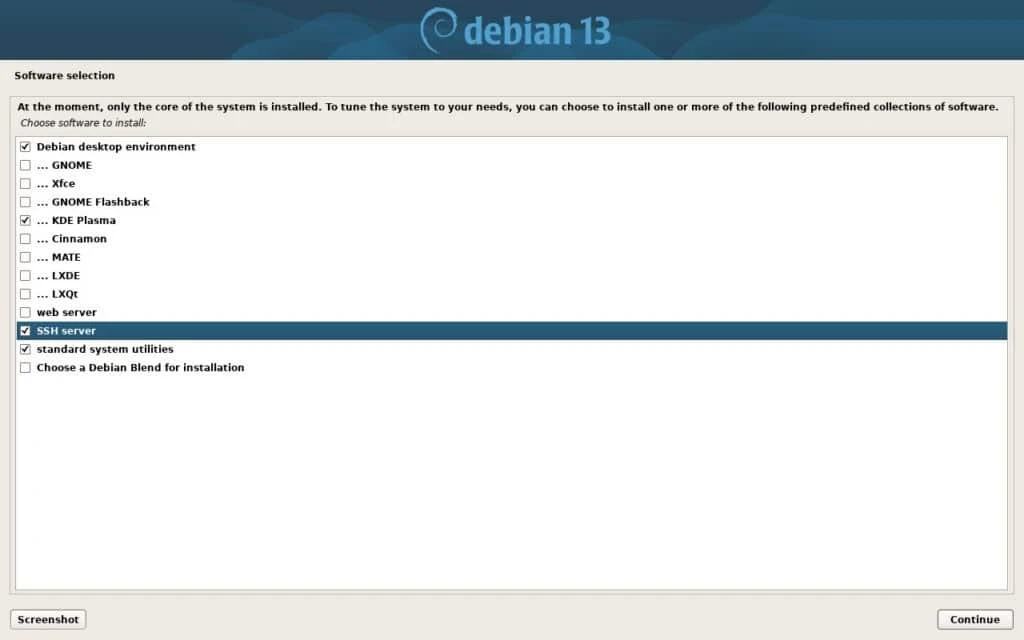
You are safe to click though the defaults as this is just a template. Once you have created the VM you will want to start it up and go though the installer. The installer defaults to installing a full desktop but we want this as a server. During install make sure to unselect “debian desktop environment” and select SSH and command line utilities so that you don’t end up with a desktop instead of a SSH server.
Once you have installed Debian, it is time to reboot. The system will take a few minutes to comes back up but once it does you can ssh into it with
ssh [your user]@[VM address]
The “your user” will be the user you created at setup (not root) and the IP can be found on Proxmox or your DHCP server. You will be prompted to trust the key on first connect.
Once you are in the shell, the first step is to escalate to root so that you can install sudo, qemu-guest-agent and nano. Run su - and then enter your root password. From there run:
# apt install sudo nano qemu-guest-agent -y
You then will want to add your user to the sudo group and disable root with:
usermod -aG sudo [your user] && passwd -l root.
This will disable root login and grant you sudo access. This is really important since having a exposed root account introduces security issues. To exit type “exit” followed by “exit” to exit out of ssh.
Disabling password authentication is critical for modern security since passwords provide way less security than public keys. First create a ssh key locally if you don’t have one already. This can be accomplished with the ssh-keygen command. Once you have a key you can run:
ssh-copy-id [your user]@[VM IP address]
If all goes correctly you should be able to ssh in to your VM without entering a user password.
After you have verified that key based SSH is working, it is safe to disable SSH password authentication. Using nano or another text editor, open up /etc/ssh/sshd_configand navigate to the line called PasswordAuthentication. When you find it uncomment it and set it to no. Save the contents with ctrl-s and exit with ctrl-x

The step is to configure the VM to regenerate SSH host keys and machine-id when they are missing. This could be accomplished by using cloud-init but I came up with a script that does this since I want to keep things light. Open up /opt/regen_system_identifiers as root with nano and paste in the following:
#!/bin/bash

#generate any missing ssh host keys

ssh-keygen -A

#generate a machine-id if it is missing

systemd-machine-id-setup
In this script we trigger automatic regeneration of the ssh host keys and machine id. Everything is handled automatically so any existing data won’t be overwritten. Once you have saved the script you will want to make it executable with:
sudo chmod +x /opt/regen_system_identifiers
To trigger this script we need a systemd unit to run it on startup. Using nano open up /etc/systemd/system/ssh-hostkey-check.service as root and add the following:
[Unit]

Description=Checks if the ssh host keys or the machine id are missing. If they are it regenerates them

[Service]

ExecStart=/opt/regen_system_identifiers

[Install]

WantedBy=default.target
Once that’s saved run:
sudo systemctl daemon-reload && sudo systemctl enable regen-system-identifiers
The newly created service will run our script when the system boots. The last step is to clean up the system. Run the following:
sudo rm /etc/machine-id

sudo rm /etc/ssh/ssh_host_*

sudo rm /root/.bash_history

sudo rm ~/.bash_history

set +o history

sudo apt clean

sudo poweroff
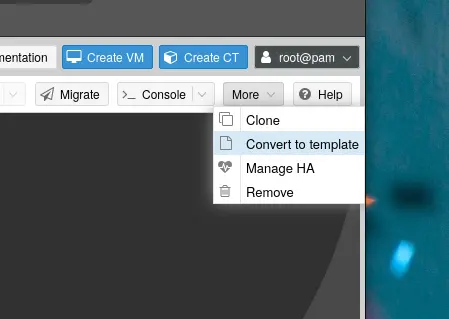
Inside Proxmox, go to more and then click on “convert to template.” This will convert the newly created VM to a template that can be reused over and over again.
You have now successfully created a Debian VM template. If everything went well you should be able to clone to a new VM. I would recommend that you only use full clones since a linked clones can create dependency issues.