<?xml version="1.0" encoding="utf-8"?><feed xmlns="http://www.w3.org/2005/Atom" ><generator uri="https://jekyllrb.com/" version="4.4.1">Jekyll</generator><link href="http://localhost:4000/feed.xml" rel="self" type="application/atom+xml" /><link href="http://localhost:4000/" rel="alternate" type="text/html" /><updated>2026-05-12T09:53:00-06:00</updated><id>http://localhost:4000/feed.xml</id><title type="html">Darin Rawson</title><subtitle>Linux, networking, and self hosting enthusiast; passionate about open source software</subtitle><entry><title type="html">Setting up FreeRadius with Samba</title><link href="http://localhost:4000/activedirectory/samba/freeradius/2026/04/29/Setting-up-FreeRadius-on-Debian-running-Samba-AD.html" rel="alternate" type="text/html" title="Setting up FreeRadius with Samba" /><published>2026-04-29T00:00:00-06:00</published><updated>2026-04-29T00:00:00-06:00</updated><id>http://localhost:4000/activedirectory/samba/freeradius/2026/04/29/Setting-up-FreeRadius-on-Debian-running-Samba-AD</id><content type="html" xml:base="http://localhost:4000/activedirectory/samba/freeradius/2026/04/29/Setting-up-FreeRadius-on-Debian-running-Samba-AD.html"><![CDATA[<p>This is the Third post in my series about setting up Samba AD and FreeRADIUS on Debian.</p>

<p>Previous step: <a href="/debian/samba/activedirectory/2026/04/28/Setup-Samba-ADDC-on-Debian.html">Setting up Samba AD DC on Debian</a></p>

<hr />

<h2 id="getting-started">Getting Started</h2>

<h3 id="step-1-install-freeradius">Step 1: Install Freeradius</h3>

<p>To install freeradius and needed tools run the following:</p>

<div class="language-plaintext highlighter-rouge"><div class="highlight"><pre class="highlight"><code>sudo apt update
sudo apt install freeradius openssl -y
</code></pre></div></div>

<h3 id="step-2-setup-certificates">Step 2: Setup certificates</h3>

<p>Start by creating a self signed certificate</p>

<div class="language-plaintext highlighter-rouge"><div class="highlight"><pre class="highlight"><code>openssl req -newkey ec -pkeyopt ec_paramgen_curve:prime256v1 -x509 -sha256 -days 730 -noenc -out server.crt -keyout server.key -subj '/C=US/ST=Colorado/L=Colorado Springs/O=UCCS/CN=Radius test server' -addext extendedKeyUsage=1.3.6.1.5.5.7.3.1 -addext "subjectAltName=DNS:debiandc.uccslab.lan" 
</code></pre></div></div>

<p>Get certificate details and then install it to FreeRadius</p>

<div class="language-plaintext highlighter-rouge"><div class="highlight"><pre class="highlight"><code>openssl x509 -in server.crt -noout -text
sudo cp server.* /etc/freeradius/3.0/certs
</code></pre></div></div>

<h3 id="step-3-allow-freeradius-to-use-ntlmv2">Step 3: Allow FreeRadius to use NTLMv2</h3>

<p>Edit smb.conf and add the following under global</p>

<div class="language-plaintext highlighter-rouge"><div class="highlight"><pre class="highlight"><code>nano /etc/samba/smb.conf
...
[global]
...
ntlm auth = mschapv2-and-ntlmv2-only
</code></pre></div></div>

<p>Then restart Samba-ad-dc (replace with Samba if domain member)</p>

<div class="language-plaintext highlighter-rouge"><div class="highlight"><pre class="highlight"><code>sudo systemctl restart samba-ad-dc
</code></pre></div></div>

<h3 id="step-4-configure-freeradius">Step 4: Configure FreeRadius</h3>

<p>First we need edit EAP to enable MSCHAPv2 via Samba’s ntlm_auth</p>

<div class="language-plaintext highlighter-rouge"><div class="highlight"><pre class="highlight"><code>sudo nano /etc/freeradius/3.0/mods-available/mschap
...
mschap {
...
    ntlm_auth = "/usr/bin/ntlm_auth --allow-mschapv2 --request-nt-key --username=%{mschap:User-Name} --challenge=%{%{mschap:Challenge}:-00} --nt-response=%{%{mschap:NT-Response}:-00}"
</code></pre></div></div>

<p>Next we need to give freeradius access to winbind</p>

<div class="language-plaintext highlighter-rouge"><div class="highlight"><pre class="highlight"><code>sudo usermod -a -G winbindd_priv freerad
sudo chown root:winbindd_priv /var/lib/samba/winbindd_privileged
</code></pre></div></div>

<p>Finally, restart freeradius</p>

<div class="language-plaintext highlighter-rouge"><div class="highlight"><pre class="highlight"><code>sudo systemctl restart freeradius
</code></pre></div></div>

<h3 id="step-5-testing">Step 5: Testing</h3>

<p>To test we need to create a test user. I’m using the username testuser and the password asdfghjkl11.</p>

<div class="language-plaintext highlighter-rouge"><div class="highlight"><pre class="highlight"><code>sudo samba-tool user add testuser
</code></pre></div></div>

<p>Next, test RADIUS</p>

<div class="language-plaintext highlighter-rouge"><div class="highlight"><pre class="highlight"><code>radtest -t mschap testuser asdfghjkl11. localhost:18120 0 testing123
</code></pre></div></div>

<p>Once testing is done disable the test user</p>

<div class="language-plaintext highlighter-rouge"><div class="highlight"><pre class="highlight"><code>sudo samba-tool user disable testuser
</code></pre></div></div>

<h3 id="step-6-adding-a-client-such-as-a-network-switch">Step 6: Adding a client (such as a network switch)</h3>

<p>To create a client, you can add the following configuration to clients.conf</p>

<div class="language-plaintext highlighter-rouge"><div class="highlight"><pre class="highlight"><code>sudo nano /etc/freeradius/3.0/clients.conf
...
client router {
	ipaddr = &lt;IP address, hostname or CIDR range&gt;
    secret = &lt;shared_secret&gt;
	require_message_authenticator = yes
}
</code></pre></div></div>

<p>“router” is the name of the device in the configuration and can be set to anything without a space.</p>

<p>“ipaddr” is the allowed source IP(s) for the client</p>

<p>“secret” is the shared secret used to authenticate the client. To generate a random hard to guess secret, you can use the following:</p>

<div class="language-plaintext highlighter-rouge"><div class="highlight"><pre class="highlight"><code>openssl rand -base64 30
</code></pre></div></div>]]></content><author><name></name></author><category term="ActiveDirectory" /><category term="Samba" /><category term="FreeRadius" /><summary type="html"><![CDATA[This is the Third post in my series about setting up Samba AD and FreeRADIUS on Debian.]]></summary></entry><entry><title type="html">Setup Samba AD DC on Debian</title><link href="http://localhost:4000/debian/samba/activedirectory/2026/04/28/Setup-Samba-ADDC-on-Debian.html" rel="alternate" type="text/html" title="Setup Samba AD DC on Debian" /><published>2026-04-28T00:00:00-06:00</published><updated>2026-04-28T00:00:00-06:00</updated><id>http://localhost:4000/debian/samba/activedirectory/2026/04/28/Setup-Samba-ADDC-on-Debian</id><content type="html" xml:base="http://localhost:4000/debian/samba/activedirectory/2026/04/28/Setup-Samba-ADDC-on-Debian.html"><![CDATA[<p>This is the second post in my series about setting up Samba AD and FreeRADIUS on Debian.</p>

<p>Next step: <a href="/activedirectory/samba/freeradius/2026/04/29/Setting-up-FreeRadius-on-Debian-running-Samba-AD.html">Setting up FreeRadius on Debian running Samba AD</a></p>

<p>Previous step: <a href="/debian/2026/04/23/Install-Debian-as-a-server.html">Install Debian as a server</a></p>

<hr />

<h2 id="getting-started">Getting started</h2>

<p>Note: I’m going to assume you already have a domain and static IP in mind. For this guide I’m going to use 10.0.2.15 and example.lan</p>

<h3 id="step-1-enable-debian-backports">Step 1: Enable Debian backports</h3>

<p>Open /etc/apt/sources.list.d/debian-backports.sources with:</p>

<div class="language-plaintext highlighter-rouge"><div class="highlight"><pre class="highlight"><code>sudo nano /etc/apt/sources.list.d/debian-backports.sources
</code></pre></div></div>

<p>and paste in the following</p>

<div class="language-plaintext highlighter-rouge"><div class="highlight"><pre class="highlight"><code>Types: deb deb-src
URIs: http://deb.debian.org/debian
Suites: trixie-backports
Components: main
Enabled: yes
Signed-By: /usr/share/keyrings/debian-archive-keyring.gpg
</code></pre></div></div>

<p>To save and exit press ctrl_s followed by ctrl+x. If you are reading this in the future Debian Trixie may be previous release. To confirm that you are running Trixie run cat /etc/os-release</p>

<h3 id="step-2-switch-to-network-manager-and-set-static-ip">Step 2: Switch to Network Manager and set static IP</h3>

<p>In order to Samba to work, it must have a static IP.  </p>

<p>First, install Network Manager and uninstall dhcpcd (dhcpcd kept overwritting resolv.conf during dns configuration)</p>

<div class="language-plaintext highlighter-rouge"><div class="highlight"><pre class="highlight"><code>sudo apt update
sudo apt install NetworkManager -y
sudo apt remove dhcpcd-base -y
</code></pre></div></div>

<p>Then open up the NetworkManager.conf with and make sure the following line is present and set to true.</p>
<div class="language-plaintext highlighter-rouge"><div class="highlight"><pre class="highlight"><code>sudo nano /etc/NetworkManager/NetworkManager.conf
...
managed=true
</code></pre></div></div>

<p>Save with ctrl-s and exit with ctrl-x</p>

<p>Next, we need to configure Network Manager. Make sure you configure the correct device</p>

<div class="language-plaintext highlighter-rouge"><div class="highlight"><pre class="highlight"><code>ip a #shows your ethernet device name. Mine is enp0s3
sudo nmcli d connect enp0s3
sudo nmcli connection modify enp0s3 ipv4.method manual ipv4.addresses 10.0.2.15/24 ipv4.gateway 10.0.2.2 #set static IP
sudo systemctl restart networking 
</code></pre></div></div>

<p>Be mindful of duplicate IPs when setting a static IP. Best practice is to reserve an IP in your DHCP server as well.</p>

<h3 id="step-3-install-samba-ad-dc">Step 3: Install Samba AD DC</h3>

<p>Run the following:</p>

<div class="language-plaintext highlighter-rouge"><div class="highlight"><pre class="highlight"><code>sudo apt install samba-ad-dc krb5-user bind9-dnsutils -t trixie-backports -y
</code></pre></div></div>

<p>If you are prompted to configure Kerberos you can leave everything as default.</p>

<h3 id="step-4-disable-unneeded-and-conflicting-services">Step 4: Disable unneeded and conflicting services</h3>

<p>Run the following:</p>

<div class="language-plaintext highlighter-rouge"><div class="highlight"><pre class="highlight"><code>sudo systemctl disable --now smbd nmbd winbind
sudo systemctl mask smbd nmbd winbind
</code></pre></div></div>

<h3 id="step-5-provision-the-domain">Step 5: Provision the domain</h3>

<p>First delete the default configuration:</p>

<div class="language-plaintext highlighter-rouge"><div class="highlight"><pre class="highlight"><code>sudo rm /etc/samba/smb.conf
</code></pre></div></div>

<p>Then provision the Active Directory domain:</p>

<div class="language-plaintext highlighter-rouge"><div class="highlight"><pre class="highlight"><code>sudo samba-tool domain provision --use-rfc2307  --interactive
</code></pre></div></div>

<p><img src="/assets/images/2026-04-28/img1.webp" alt="config samba" /></p>

<p>
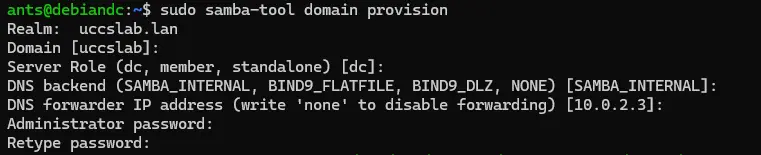
This command will take a little time to run but at the end you will have a Active Directory domain. Do not continue if this command fails. For the DNS forwarder make sure you point it to a DNS server somewhere else on the internet. </p>

<p>For more information: https://wiki.samba.org/index.php/Setting_up_Samba_as_an_Active_Directory_Domain_Controller</p>

<h3 id="step-6-configure-dns">Step 6: Configure DNS</h3>

<p>In order to Samba to work, all DNS queries must go though Samba. First, disable Network Manager DNS</p>

<div class="language-plaintext highlighter-rouge"><div class="highlight"><pre class="highlight"><code>sudo nano /etc/NetworkManager/conf.d/90-dns-none.conf
...
[main]
dns=none
</code></pre></div></div>

<p>Then restart NetworkManager with</p>

<div class="language-plaintext highlighter-rouge"><div class="highlight"><pre class="highlight"><code>sudo systemctl restart NetworkManager
</code></pre></div></div>

<p>It is now time to configure resolv.conf</p>

<div class="language-plaintext highlighter-rouge"><div class="highlight"><pre class="highlight"><code>sudo rm /etc/resolv.conf
sudo nano /etc/resolv.conf
</code></pre></div></div>

<p>and paste in the following (replace example.lan with your realm name)</p>

<div class="language-plaintext highlighter-rouge"><div class="highlight"><pre class="highlight"><code>nameserver 10.0.2.15
search example.lan
</code></pre></div></div>

<p>Next, we need to update /etc/hosts (replace DNS and IP with your DNS name and IP)</p>

<div class="language-plaintext highlighter-rouge"><div class="highlight"><pre class="highlight"><code>sudo nano /etc/hosts
...
10.0.2.15       debiandc debiandc.example.lan
127.0.0.1       localhost

# The following lines are desirable for IPv6 capable hosts
::1     localhost ip6-localhost ip6-loopback
ff02::1 ip6-allnodes
ff02::2 ip6-allrouters
</code></pre></div></div>

<p>Save with ctrl-s and exit with ctrl-x</p>

<p>If DNS breaks you may need to restart Samba</p>

<div class="language-plaintext highlighter-rouge"><div class="highlight"><pre class="highlight"><code>sudo systemctl restart samba-ad-dc
</code></pre></div></div>

<h3 id="step-7-start-samba-ad-dc">Step 7: Start Samba AD DC</h3>

<p>Start Samba with:</p>

<div class="language-plaintext highlighter-rouge"><div class="highlight"><pre class="highlight"><code>sudo systemctl start samba-ad-dc
</code></pre></div></div>

<h3 id="step-8-configure-kerberos">Step 8: Configure kerberos</h3>

<div class="language-plaintext highlighter-rouge"><div class="highlight"><pre class="highlight"><code>sudo cp -f /var/lib/samba/private/krb5.conf /etc/krb5.conf
</code></pre></div></div>

<p>This configures Kerberos on the Debian system to use Samba.</p>

<h3 id="step-9-configure-chrony">Step 9: Configure Chrony</h3>

<p>First, install Chony</p>

<div class="language-plaintext highlighter-rouge"><div class="highlight"><pre class="highlight"><code>sudo systemctl stop systemd-timesyncd
sudo systemctl mask systemd-timesyncd
sudo apt install chrony -y
</code></pre></div></div>

<p>Then configure the ntp_signed directory</p>

<div class="language-plaintext highlighter-rouge"><div class="highlight"><pre class="highlight"><code>sudo chown root:_chrony /var/lib/samba/ntp_signd/
sudo chmod 750 /var/lib/samba/ntp_signd/
</code></pre></div></div>

<p>Next configure Chrony with the following configuration (replace the IP with yours)</p>

<div class="language-plaintext highlighter-rouge"><div class="highlight"><pre class="highlight"><code>sudo nano /etc/chrony/chrony.conf
...
#Paste this in

# Welcome to the chrony configuration file. See chrony.conf(5) for more
# information about usuable directives.

# This directive specify the location of the file containing ID/key pairs for
# NTP authentication.
keyfile /etc/chrony/chrony.keys

# This directive specify the file into which chronyd will store the rate
# information.
driftfile /var/lib/chrony/chrony.drift

# Uncomment the following line to turn logging on.
#log tracking measurements statistics

# Log files location.
logdir /var/log/chrony

# Stop bad estimates upsetting machine clock.
maxupdateskew 100.0

# This directive tells 'chronyd' to parse the 'adjtime' file to find out if the
# real-time clock keeps local time or UTC. It overrides the 'rtconutc' directive.
hwclockfile /etc/adjtime

# This directive enables kernel synchronisation (every 11 minutes) of the
# real-time clock. Note that it can’t be used along with the 'rtcfile' directive.
rtcsync

# Step the system clock instead of slewing it if the adjustment is larger than
# one second, but only in the first three clock updates.
makestep 1 3

# ipaddress of this DC - CHANGEME
bindcmdaddress 10.0.2.15

# The source, where we are receiving the time from
server 0.us.pool.ntp.org	iburst
server 1.us.pool.ntp.org	iburst
server 2.us.pool.ntp.org	iburst

# dns netmask
allow 0.0.0.0/0

ntpsigndsocket  /usr/local/samba/var/lib/ntp_signd
</code></pre></div></div>

<p>Now we need to start it</p>

<div class="language-plaintext highlighter-rouge"><div class="highlight"><pre class="highlight"><code>sudo systemctl enable chrony
sudo systemctl start chrony
</code></pre></div></div>

<p>Note: If you are running Debian with Samba in a VM the VM may end up being paused if the host goes to sleep. This can result in a large clock screw that will cause issues. If you ever run into a issue caused by the system having the wrong time it usually can be corrected by restarting Chrony.</p>

<h3 id="step-10-perform-health-checks">
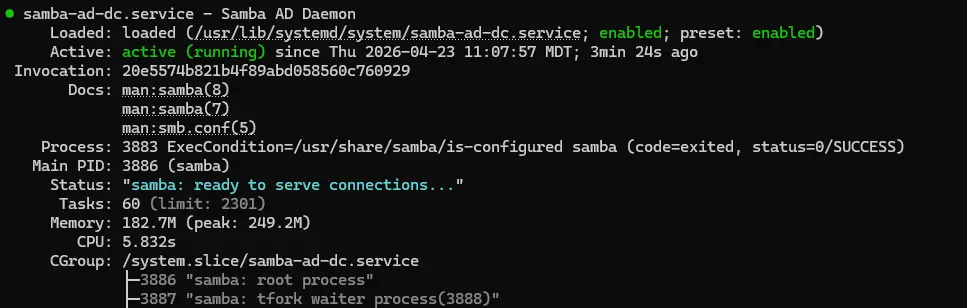
Step 10: Perform health checks</h3>

<p>Now that Samba AD DC is running it is time to check to see if everything is working. First, check to see if Samba AD DC is running. </p>

<div class="language-plaintext highlighter-rouge"><div class="highlight"><pre class="highlight"><code>sudo systemctl status samba-ad-dc
</code></pre></div></div>

<p>It should look like this:</p>

<p><img src="/assets/images/2026-04-28/img2.webp" alt="Samba status" /></p>

<p>Next, check to see if local DNS is working. </p>

<div class="language-plaintext highlighter-rouge"><div class="highlight"><pre class="highlight"><code>dig @127.0.0.1 google.com
</code></pre></div></div>

<p>This should return the IP address for google.com</p>

<p>Lastly, check to see if you can get a Kerberos ticket.</p>

<div class="language-plaintext highlighter-rouge"><div class="highlight"><pre class="highlight"><code>kinit Administrator
</code></pre></div></div>

<p>Congrats, you now have a working DC</p>

<h3 id="step-11-enable-local-login-with-ad-credentials-optional">Step 11: Enable local login with AD credentials (optional)</h3>

<p>While we have a working DC, some additional steps are needed for AD login. More specifically, we need to configure winbind to map Windows users to UNIX users. Please note that SSSD AD authentication is not compatible with Winbind and should not be setup on the same system.</p>

<p>First, install dependencies</p>

<div class="language-plaintext highlighter-rouge"><div class="highlight"><pre class="highlight"><code>sudo apt install winbind libnss-winbind libpam-winbind -t trixie-backports
</code></pre></div></div>

<p>Then edit smb.conf to configure winbind</p>

<div class="language-plaintext highlighter-rouge"><div class="highlight"><pre class="highlight"><code>sudo nano /etc/samba/smb.conf
...
[global]
...
    # - add this under global - 
	# Configure homedir and shell
	template shell = /bin/bash
    template homedir = /home/%U
</code></pre></div></div>

<p>Then restart samba ad and enable home directory creation</p>

<div class="language-plaintext highlighter-rouge"><div class="highlight"><pre class="highlight"><code>sudo systemctl restart samba-ad-dc
sudo pam-auth-update --enable mkhomedir
</code></pre></div></div>

<p>You now should be able to login with AD credentials</p>

<div class="language-plaintext highlighter-rouge"><div class="highlight"><pre class="highlight"><code>id [username]
su - [username]
</code></pre></div></div>

<h3 id="step-12-managing-users-and-groups-with-samba-tool-optional">Step 12: Managing users and groups with samba-tool (optional)</h3>

<p>Here are some common user commands</p>

<div class="language-plaintext highlighter-rouge"><div class="highlight"><pre class="highlight"><code>sudo samba-tool user list #list users
sudo samba-tool user add username #add user

sudo samba-tool group list #list groups
sudo samba-tool group add groupname #create group
sudo samba-tool group addmembers groupname username #add user to group
</code></pre></div></div>

<h3 id="step-13-administering-samba-ad-with-microsoft-rsat-tools-optional">Step 13: Administering Samba AD with Microsoft RSAT tools (optional)</h3>

<p>First, on a Windows device, install the tools with Powershell:</p>

<div class="language-plaintext highlighter-rouge"><div class="highlight"><pre class="highlight"><code>Get-WindowsCapability -Name Rsat* -Online | Add-WindowsCapability -Online
</code></pre></div></div>

<p>If your machine is not domain joined to Samba you will need to manually connect to the DC</p>

<h3 id="step-14-raise-functional-level-to-2016-optional">Step 14: Raise functional level to 2016 (optional)</h3>

<p>In Active directory, the 2016 functional level was introduced with Windows server 2016 and was the latest version until the release of Windows server 2025. The 2016 functional level introduces several new features such as group managed service accounts. This feature is still considered experimental by the Samba developers</p>

<p>To start, edit the smb.conf file</p>

<div class="language-plaintext highlighter-rouge"><div class="highlight"><pre class="highlight"><code>sudo nano /etc/samba/smb.conf

and add the following line under [global]

[global]
...
	ad dc functional level = 2016
</code></pre></div></div>

<p>Press ctrl-s followed by ctrl-x to save and exit. Then restart Samba with</p>

<div class="language-plaintext highlighter-rouge"><div class="highlight"><pre class="highlight"><code>sudo systemctl restart samba-ad-dc
</code></pre></div></div>

<p>You now should see the lowest functional level as 2016. You can check by running</p>

<div class="language-plaintext highlighter-rouge"><div class="highlight"><pre class="highlight"><code>sudo samba-tool domain level show
</code></pre></div></div>

<p>Assuming everything is still working we can bump up the functional level</p>

<div class="language-plaintext highlighter-rouge"><div class="highlight"><pre class="highlight"><code>sudo samba-tool domain level raise --domain-level=2016 --forest-level=2016
</code></pre></div></div>

<p>The domain now should be at the 2016 functional level.</p>

<h3 id="step-15-joining-another-dc-optional">Step 15: Joining another DC (optional)</h3>

<p>Another DC to your existing Samba DC can be a little tricky so be thoughtful about how you do this. Most of the steps above here apply to joining a existing domain with the exception of the provisioning step.</p>

<p>When joining, you will need to point the DNS of the DC you want to join temporarily at Samba before you change it back to itself. </p>

<p>https://wiki.samba.org/index.php/Joining_a_Samba_DC_to_an_Existing_Active_Directory</p>

<p>Additionally, sysvol replication is not built into Samba. You will need to setup your own solution such as Rsync over SSH. There are many different ways to do this so I won’t cover it here.</p>]]></content><author><name></name></author><category term="Debian" /><category term="Samba" /><category term="ActiveDirectory" /><summary type="html"><![CDATA[This is the second post in my series about setting up Samba AD and FreeRADIUS on Debian.]]></summary></entry><entry><title type="html">I’ve switched to Jekyll and so can you</title><link href="http://localhost:4000/jekyll/2026/04/25/im-using-jekyll.html" rel="alternate" type="text/html" title="I’ve switched to Jekyll and so can you" /><published>2026-04-25T00:00:00-06:00</published><updated>2026-04-25T00:00:00-06:00</updated><id>http://localhost:4000/jekyll/2026/04/25/im-using-jekyll</id><content type="html" xml:base="http://localhost:4000/jekyll/2026/04/25/im-using-jekyll.html"><![CDATA[<p><img src="/assets/images/2026-04-25/img1.webp" alt="image1" /></p>

<p>This is my first post on Jekyll!</p>

<p>I was actually supprised by how easy it was to get started. I’m using the Jekyll packaged though Fedora along with the Minima theme. Using the Fedora package is a little different than what is typically recommended but it seems to make everything easier.</p>

<p>Before we begin, I should back up and explain Jekyll. Jekyll is what is called a static site generator. What that means is that you build your site in a friendly easy to use language like markdown and then when you are ready you tell Jekyll to build a HTML site from the resulting markdown. The HTML site then can be deployed to a web server to be served to the internet as a plain HTML site. In a way, Jekyll is like a compiler. The content you create in markdown is a lot like source code and the resulting site is like a binary.</p>

<h3 id="install">install</h3>

<p>To start, create a new environment with distrobox.</p>
<div class="language-plaintext highlighter-rouge"><div class="highlight"><pre class="highlight"><code>distrobox create jekyllenv --image fedora:latest
</code></pre></div></div>

<p>Next, enter it and install dependencies</p>

<div class="language-plaintext highlighter-rouge"><div class="highlight"><pre class="highlight"><code>distrobox enter jekyllenv
sudo dnf update 
sudo dnf install rubygem-jekyll rubygem-minima
</code></pre></div></div>

<p>We now have Jekyll installed</p>

<p>To create a new site run</p>
<div class="language-plaintext highlighter-rouge"><div class="highlight"><pre class="highlight"><code>jekyll new supercoolsite
</code></pre></div></div>

<h3 id="basic-configuration">Basic configuration</h3>

<p>I would then start by configuring the _config.yml file. You can open it in your favorite text editor.</p>

<p>For information about configuring the Minima theme click here: <a href="https://github.com/jekyll/minima/tree/2.5-stable">https://github.com/jekyll/minima/tree/2.5-stable</a></p>

<p>The _config.yml file is where you set global information such as site title, description, and socials</p>

<p>Addtionally, You can add headers to your site like so:</p>

<div class="language-plaintext highlighter-rouge"><div class="highlight"><pre class="highlight"><code>header_pages:
  - stuff.md
  - about.md
</code></pre></div></div>

<p>Do note that .md and .markdown are equivalent files in Jekyll</p>

<h3 id="creating-pages">creating pages</h3>

<p>To create a page, simply create a file endeding in .md or .markdown inside the root of your site. For the page to show up it must have the proper header like the one below:</p>

<div class="language-plaintext highlighter-rouge"><div class="highlight"><pre class="highlight"><code>---
layout: post
title:  "Links"

---
</code></pre></div></div>

<p>Addtionally, directorys and assets are supported. For my site I created an assets directory in the root of my site that contains all my images. When adding images to your site I would strongly encourage that you convert the image to webp with ImageMagik since it will make your site a lot faster.</p>

<h3 id="writing-posts">Writing posts</h3>

<p>Posts live under the <code class="language-plaintext highlighter-rouge">_posts</code> directory have specical formating just like any Jekyll page. Each file name takes the form year-month-day-page-title.md so make sure you name your posts correctly.</p>

<p>Addtionally, each post file needs a header like the one below.</p>

<div class="language-plaintext highlighter-rouge"><div class="highlight"><pre class="highlight"><code>---
layout: post
title:  "I've switched to Jekyll and you can too"
date:   2026-04-25
categories: jekyll
published: true
---
</code></pre></div></div>

<p>When creating new posts be sure to follow the correct format.</p>

<h3 id="deploying">Deploying</h3>

<p>If you just want to test our your site locally, you can run:</p>

<div class="language-plaintext highlighter-rouge"><div class="highlight"><pre class="highlight"><code>jekyll serve
</code></pre></div></div>

<p>To actually deploy Jekyll run:</p>
<div class="language-plaintext highlighter-rouge"><div class="highlight"><pre class="highlight"><code>jekyll build
</code></pre></div></div>

<p>Your site will be generated and put in the _site directory. This then can be copied to a web server for deployment with a tool like rsync.</p>]]></content><author><name></name></author><category term="jekyll" /><summary type="html"><![CDATA[]]></summary></entry><entry><title type="html">Install Debian as a server</title><link href="http://localhost:4000/debian/2026/04/23/Install-Debian-as-a-server.html" rel="alternate" type="text/html" title="Install Debian as a server" /><published>2026-04-23T00:00:00-06:00</published><updated>2026-04-23T00:00:00-06:00</updated><id>http://localhost:4000/debian/2026/04/23/Install-Debian-as-a-server</id><content type="html" xml:base="http://localhost:4000/debian/2026/04/23/Install-Debian-as-a-server.html"><![CDATA[<p>This is the first post in my series about setting up Samba AD and FreeRADIUS on Debian.</p>

<p>Next step: <a href="/debian/samba/activedirectory/2026/04/28/Setup-Samba-ADDC-on-Debian.html">Setting up Samba AD DC on Debian</a></p>

<hr />

<h2 id="getting-started">Getting started</h2>

<p>To start you will need a internet connection and somewhere to install Debian. Debian can be installed in a virtual machine or it can be run on physical hardware.</p>

<h3 id="step-1-get-debian">Step 1: Get Debian</h3>

<p>Visit debian.org and click Download. This will Download the ISO file for the installer so that we can get started installing Debian. If you are going to install Debian on physical hardware you will need to write the ISO to physical hardware with software such as Rufus. After you download Debian you will need to boot to the installer.</p>

<h3 id="step-2-start-the-installer">Step 2: Start the installer</h3>

<p>Once you boot up the install select “Graphical install” to get started. You should end up on a page like this one:</p>

<p><img src="/assets/images/2026-04-23/img1.webp" alt="installer screen" /></p>

<h3 id="step-3-regional-configuration">Step 3: Regional configuration</h3>

<p>Most of the defaults are completely fine so you can continue to hit continue. However, you will want to set a meaningful hostname. For the domain name it is likely best to leave it blank but you can configure it as needed. </p>

<h3 id="step-4-user-configuration">Step 4: User configuration</h3>

<p>After the hostname is set you will get to the root user configuration step:</p>

<p><img src="/assets/images/2026-04-23/img2.webp" alt="root setup screen" /></p>

<p>For security, we will be disabling the root user in a later step. You can set this to anything memorable such as root123 since the password will be cleared on disable.</p>

<p>The next step is creating a user. You will want to thoughtfully choose a username and password since this will be your main login. I would recommend setting the username and full name of the user to the same value.</p>

<h3 id="step-5-time-zone">Step 5: Time zone</h3>

<p>Make sure you set the correct time zone</p>

<p><img src="/assets/images/2026-04-23/img3.webp" alt="root setup screen" /></p>

<h3 id="step-6-partitioning">Step 6: Partitioning</h3>

<p><img src="/assets/images/2026-04-23/img4.webp" alt="root setup screen" /></p>

<p>I would recommend using the default option of “use entire disk” along with “All files in one partition.”  While it is possible to do more complex partition layouts I strongly recommend sticking with a single partition since it make everything simpler. Do make sure you select the correct drive if you have multiple disks plugged in.</p>

<p>The final step if partitioning is to select yes when it asks if you want to write changes. This will destroy any data on the target drive so be careful</p>

<h3 id="step-7-wait-for-the-base-install-to-finish">Step 7: Wait for the base install to finish</h3>

<p>You now wait for the base system to install</p>

<h3 id="step-8-skip-additional-media-and-others">Step 8: Skip additional media and others</h3>

<p>back in the day it wasn’t uncommon to install additional software from a DVD. This is no longer standard practice and can be skipped. Likewise you can continue to hit continue until you reach this screen:</p>

<p><img src="/assets/images/2026-04-23/img5.webp" alt="root setup screen" /></p>

<p>The installer is now configuring your package manager so it will take a few minutes.</p>

<h3 id="step-9-enable-telemetry">Step 9: Enable telemetry</h3>

<p><img src="/assets/images/2026-04-23/img6.webp" alt="root setup screen" /></p>

<p>While not technically necessary, I like to enable telemetry since it allows the Debian project to prioritize work on software being actively used by the community.</p>

<h3 id="step-10-additional-software-via-tasksel-important">Step 10: Additional software via Tasksel (important)</h3>

<p><img src="/assets/images/2026-04-23/img7.webp" alt="root setup screen" /></p>

<p>For a server, you will want to uncheck anything to do with a desktop environment and select system utilities and a SSH server. Don’t just hit continue here</p>

<p>You will need to wait a few minutes for the software to install</p>

<h3 id="step-11-install-the-bootloader">Step 11: Install the bootloader</h3>

<p><img src="/assets/images/2026-04-23/img8.webp" alt="root setup screen" /></p>

<p>Once you get to this screen you will want to hit yes followed by the the device that you installed Debian onto. Chances are it will be something like /dev/sda or /dev/vda. If you install the bootloader to the wrong drive the system will fail to boot when the drive with the bootloader is missing. Once the bootloader is installed you can hit continue to reboot.</p>

<h3 id="step-12-boot-up-the-system">Step 12: Boot up the system</h3>

<p>Once the system reboots you should see the grub bootloader screen for Debian. it will automatically boot after 5 seconds and eventually you should get to the Debian login screen.</p>

<h3 id="step-13-setup-sudo">Step 13: Setup sudo</h3>

<p>You should now be able to login with your username and password. Once logged in you will want to switch to root with su -. (You will be prompted for the root password)</p>

<p>Once you are root (the prompt will start with #) run the following commands:</p>

<div class="language-plaintext highlighter-rouge"><div class="highlight"><pre class="highlight"><code>apt install sudo -y
usermod -aG sudo [your user]
exit
</code></pre></div></div>

<p>You now should be back to your normal user. However, you will need to log out and then back in for the next step.</p>

<p>Once you are logged back in, lock the root user with </p>

<div class="language-plaintext highlighter-rouge"><div class="highlight"><pre class="highlight"><code>sudo passwd -l root
</code></pre></div></div>

<p>The root user should now be locked.</p>

<h3 id="step-14-setup-ssh-key-based-authentication">Step 14: Setup SSH key based authentication</h3>

<p>On your local (non Debian) system, make sure you have a SSH key. You can generate one with ssh-keygen</p>

<p>Once you can SSH into the Debian machine with:</p>

<div class="language-plaintext highlighter-rouge"><div class="highlight"><pre class="highlight"><code>ssh [your username]@[IP or hostname]
</code></pre></div></div>

<p>One first connect, you will be prompted to trust on first use. Type in yes and then enter your password. If you get a scary warning about host identification changing you will want to delete the relevant entries out of known_hosts.</p>

<p>Once you have confirmed that you can log in, run the following command on your local (non Debian) system to add your SSH key as trusted</p>

<div class="language-plaintext highlighter-rouge"><div class="highlight"><pre class="highlight"><code>ssh [username]@[IP or hostname] "mkdir .ssh"
cat ~\.ssh\id_ed25519.pub | ssh [username]@[IP or hostname] "cat &gt;&gt; .ssh/authorized_keys"
</code></pre></div></div>

<p>Keep in mind that » appends so if you run this more than once you will get duplicate entries</p>

<p>You should now be able to log in without a password.</p>

<h3 id="step-15-disable-password-based-authentication">Step 15: Disable password based authentication</h3>

<p>Now that we setup key based SSH, there is no need for password based authentication. Password based authentication is considered insecure as it is much easier to steal a password than a key. Run the following to open up the SSH config file.</p>

<div class="language-plaintext highlighter-rouge"><div class="highlight"><pre class="highlight"><code>sudo nano /etc/ssh/sshd_config
</code></pre></div></div>

<p>Then navigate down to the line </p>

<div class="language-plaintext highlighter-rouge"><div class="highlight"><pre class="highlight"><code>#PasswordAuthentication yes
</code></pre></div></div>

<p>and change it to </p>

<div class="language-plaintext highlighter-rouge"><div class="highlight"><pre class="highlight"><code>PasswordAuthentication no
</code></pre></div></div>

<p>To save and exit , press ctrl+s followed by ctrl+x</p>

<p>To apply changes run </p>

<div class="language-plaintext highlighter-rouge"><div class="highlight"><pre class="highlight"><code>sudo systemctl restart ssh
</code></pre></div></div>

<h3 id="step-16-last-steps">Step 16: Last steps</h3>

<p>The system is now installed and ready to go. I would recommend checking out the Debian wiki as it as lots of useful information about Debian. Make sure you stay on top of updates as a out of date system can present serious security issues.</p>]]></content><author><name></name></author><category term="Debian" /><summary type="html"><![CDATA[This is the first post in my series about setting up Samba AD and FreeRADIUS on Debian.]]></summary></entry><entry><title type="html">Create a Debian VM template in Proxmox</title><link href="http://localhost:4000/proxmox/debian/linux/2026/04/13/Create-a-Debian-VM-template-in-Proxmox.html" rel="alternate" type="text/html" title="Create a Debian VM template in Proxmox" /><published>2026-04-13T00:00:00-06:00</published><updated>2026-04-13T00:00:00-06:00</updated><id>http://localhost:4000/proxmox/debian/linux/2026/04/13/Create-a-Debian-VM-template-in-Proxmox</id><content type="html" xml:base="http://localhost:4000/proxmox/debian/linux/2026/04/13/Create-a-Debian-VM-template-in-Proxmox.html"><![CDATA[<p>Debian is a lightweight Linux distribution that is well supported and designed to be stable. However, creating a VM template is not that straight forward. In this guide I’m going to assume you have used Proxmox before and have a decent idea of how to administer Debian. Before beginning make sure you have the Debian installer iso uploaded to Proxmox.</p>

<p>To start, create a new VM in Proxmox.</p>

<p><img src="/assets/images/2026-04-13/img1.webp" alt="image1" /></p>

<p>You are safe to click though the defaults as this is just a template. Once you have created the VM you will want to start it up and go though the installer. The installer defaults to installing a full desktop but we want this as a server. During install make sure to unselect “debian desktop environment” and select SSH and command line utilities so that you don’t end up with a desktop instead of a SSH server.</p>

<p><img src="/assets/images/2026-04-13/img2.webp" alt="image2" /></p>

<p>Once you have installed Debian, it is time to reboot. The system will take a few minutes to comes back up but once it does you can ssh into it with</p>

<div class="language-plaintext highlighter-rouge"><div class="highlight"><pre class="highlight"><code>ssh [your user]@[VM address] 
</code></pre></div></div>

<p>The “your user” will be the user you created at setup (not root) and the IP can be found on Proxmox or your DHCP server. You will be prompted to trust the key on first connect.</p>

<p>Once you are in the shell, the first step is to escalate to root so that you can install sudo, qemu-guest-agent and nano. Run su - and then enter your root password. From there run:</p>

<div class="language-plaintext highlighter-rouge"><div class="highlight"><pre class="highlight"><code># apt install sudo nano qemu-guest-agent -y
</code></pre></div></div>

<p>You then will want to add your user to the sudo group and disable root with:</p>

<div class="language-plaintext highlighter-rouge"><div class="highlight"><pre class="highlight"><code>usermod -aG sudo [your user] &amp;&amp; passwd -l root. 
</code></pre></div></div>

<p>This will disable root login and grant you sudo access. This is really important since having a exposed root account introduces security issues. To exit type “exit” followed by “exit” to exit out of ssh.</p>

<p>Disabling password authentication is critical for modern security since passwords provide way less security than public keys. First create a ssh key locally if you don’t have one already. This can be accomplished with the ssh-keygen command. Once you have a key you can run:</p>

<div class="language-plaintext highlighter-rouge"><div class="highlight"><pre class="highlight"><code>ssh-copy-id [your user]@[VM IP address] 
</code></pre></div></div>

<p>If all goes correctly you should be able to ssh in to your VM without entering a user password.</p>

<p>After you have verified that key based SSH is working, it is safe to disable SSH password authentication. Using nano or another text editor, open up /etc/ssh/sshd_configand navigate to the line called PasswordAuthentication. When you find it uncomment it and set it to no. Save the contents with ctrl-s and exit with ctrl-x</p>

<p><img src="/assets/images/2026-04-13/img3.webp" alt="image3" /></p>

<p>The step is to configure the VM to regenerate SSH host keys and machine-id when they are missing. This could be accomplished by using cloud-init but I came up with a script that does this since I want to keep things light. Open up /opt/regen_system_identifiers as root with nano and paste in the following:</p>

<div class="language-plaintext highlighter-rouge"><div class="highlight"><pre class="highlight"><code>#!/bin/bash

#generate any missing ssh host keys

ssh-keygen -A

#generate a machine-id if it is missing

systemd-machine-id-setup
</code></pre></div></div>

<p>In this script we trigger automatic regeneration of the ssh host keys and machine id. Everything is handled automatically so any existing data won’t be overwritten. Once you have saved the script you will want to make it executable with:</p>

<div class="language-plaintext highlighter-rouge"><div class="highlight"><pre class="highlight"><code>sudo chmod +x /opt/regen_system_identifiers
</code></pre></div></div>

<p>To trigger this script we need a systemd unit to run it on startup. Using nano open up /etc/systemd/system/ssh-hostkey-check.service as root and add the following:</p>

<div class="language-plaintext highlighter-rouge"><div class="highlight"><pre class="highlight"><code>[Unit]

Description=Checks if the ssh host keys or the machine id are missing. If they are it regenerates them

[Service]

ExecStart=/opt/regen_system_identifiers

[Install]

WantedBy=default.target
</code></pre></div></div>

<p>Once that’s saved run:</p>

<div class="language-plaintext highlighter-rouge"><div class="highlight"><pre class="highlight"><code>sudo systemctl daemon-reload &amp;&amp; sudo systemctl enable regen-system-identifiers
</code></pre></div></div>

<p>The newly created service will run our script when the system boots. The last step is to clean up the system. Run the following:</p>

<div class="language-plaintext highlighter-rouge"><div class="highlight"><pre class="highlight"><code>sudo rm /etc/machine-id 

sudo rm /etc/ssh/ssh_host_*

sudo rm /root/.bash_history

sudo rm ~/.bash_history 

set +o history

sudo apt clean

sudo poweroff
</code></pre></div></div>

<p>Inside Proxmox, go to more and then click on “convert to template.” This will convert the newly created VM to a template that can be reused over and over again.</p>

<p><img src="/assets/images/2026-04-13/img4.webp" alt="image4" /></p>

<p>You have now successfully created a Debian VM template. If everything went well you should be able to clone to a new VM. I would recommend that you only use full clones since a linked clones can create dependency issues.</p>]]></content><author><name></name></author><category term="Proxmox" /><category term="Debian" /><category term="Linux" /><summary type="html"><![CDATA[Debian is a lightweight Linux distribution that is well supported and designed to be stable. However, creating a VM template is not that straight forward. In this guide I’m going to assume you have used Proxmox before and have a decent idea of how to administer Debian. Before beginning make sure you have the Debian installer iso uploaded to Proxmox.]]></summary></entry><entry><title type="html">ACME is not that scary</title><link href="http://localhost:4000/acme/certificates/2026/04/10/acme-is-not-that-scary.html" rel="alternate" type="text/html" title="ACME is not that scary" /><published>2026-04-10T00:00:00-06:00</published><updated>2026-04-10T00:00:00-06:00</updated><id>http://localhost:4000/acme/certificates/2026/04/10/acme-is-not-that-scary</id><content type="html" xml:base="http://localhost:4000/acme/certificates/2026/04/10/acme-is-not-that-scary.html"><![CDATA[<p>I’ve seen several people complain about the upcoming 47-day maximum lifetime for web certificates. The concern is that such a short lifetime will make certificate renewal a hassle.</p>

<p>I believe this perspective comes from those who are accustomed to older practices. If you aren’t already using ACME, now is the time to adopt it. With Let’s Encrypt rolling out 7-day certificates it is feasible to maintain short certificate lifetimes thus limiting the potential damage from a certificate compromise. Many vendors including Proxmox have built-in ACME support which works by leveraging APIs from DNS services like Cloudflare or Amazon’s Route 53 to obtain certificates without exposing anything directly to the internet.</p>

<p>For systems lacking ACME support, you can use software like ACME.sh or Lego to fetch certificates. From there you can use SCP (or any other file copy protocol) to deploy them to a device. Alternatively, you can use a reverse proxy like Caddy, Nginx, or HAproxy to handle TLS so that you don’t have to deploy certificates to every device.</p>]]></content><author><name></name></author><category term="ACME" /><category term="Certificates" /><summary type="html"><![CDATA[I’ve seen several people complain about the upcoming 47-day maximum lifetime for web certificates. The concern is that such a short lifetime will make certificate renewal a hassle.]]></summary></entry><entry><title type="html">Containerlab beginnings</title><link href="http://localhost:4000/networking/docker/containerlab/2026/01/10/containerlab-beginnings.html" rel="alternate" type="text/html" title="Containerlab beginnings" /><published>2026-01-10T00:00:00-07:00</published><updated>2026-01-10T00:00:00-07:00</updated><id>http://localhost:4000/networking/docker/containerlab/2026/01/10/containerlab-beginnings</id><content type="html" xml:base="http://localhost:4000/networking/docker/containerlab/2026/01/10/containerlab-beginnings.html"><![CDATA[<p><img src="/assets/images/2026-01-10/img1.webp" alt="image1" /></p>

<p>I am glad that I finally got around to learning Containerlab. It is frankly amazing and relatively simple to get going.</p>

<p>One thing I did learn: go with regular Linux containers where possible. Vendor images can be useful to learn vendor specific stuff but they are much more complicated to get going.</p>]]></content><author><name></name></author><category term="networking" /><category term="docker" /><category term="containerlab" /><summary type="html"><![CDATA[]]></summary></entry><entry><title type="html">Overlay VPN infodump</title><link href="http://localhost:4000/networking/overlayvpn/2025/10/25/overlay-vpn.html" rel="alternate" type="text/html" title="Overlay VPN infodump" /><published>2025-10-25T00:00:00-06:00</published><updated>2025-10-25T00:00:00-06:00</updated><id>http://localhost:4000/networking/overlayvpn/2025/10/25/overlay-vpn</id><content type="html" xml:base="http://localhost:4000/networking/overlayvpn/2025/10/25/overlay-vpn.html"><![CDATA[<h3 id="what-are-overlay-vpns">What are Overlay VPNs?</h3>

<p>Overlay VPNs are a type of Virtual Private Network (VPN) that facilitate a virtual network overlay that runs on top of whatever internet service happens to be present. What that means is you can have a remote or local user access something like a web server without exposing the web server to the internet. Many overlay VPNs also support tunneling all internet traffic like a traditional VPN but it isn’t strictly necessary.</p>

<h3 id="what-is-wireguard">What is Wireguard?</h3>

<p>Wireguard is a VPN protocol that establishes a layer 3 virtual connection between a set of peers. It uses UDP and to authenticate you set both keys and IP addresses on each end. It is highly efficient and secure since it doesn’t have a bunch of extra features. It encrypts traffic and then decrypts traffic with the keys you set. </p>

<p>The major drawbacks of Wireguard include its lack of any way to manage and authenticate users like OpenVPN and similar protocols. It is purely designed as a layer 3 tunnel to transmit packets over.</p>

<h3 id="the-roll-of-overlay-vpn-services">The roll of overlay VPN services</h3>

<p>Some of the more open overlay VPN services use Wireguard as a underlying protocol. In these types of products the software and upstream service control things like permissions, IP addresses and NAT/Firewall hole punching. Many overlay network services are designed to allow tight controls while having good performance which is why Wireguard is commonly used under the hood. The overlay VPN software talks to Wireguard and tells it what keys, address and routes to use. </p>

<p>To learn more about NAT traversal check out the nice write up from Tailscale: <a href="https://tailscale.com/blog/how-nat-traversal-works">https://tailscale.com/blog/how-nat-traversal-works</a></p>

<h3 id="mainstream-overlay-vpn-services">Mainstream overlay VPN services</h3>

<h4 id="tailscale">Tailscale</h4>

<p>Tailscale is the most popular since it was the first to offer a user friendly commercial overlay network service. It offers tight controls and many cool features like managed reverse proxies. The biggest downside with Tailscale is that it is complex to manage since ACLs are controlled via a text file instead of a GUI. Tailscale also does so many different things to the point where it can be overwhelming to use for basic tasks. From a open source/libre perspective, Tailscale does have fully open clients but the server side software is proprietary. You can still self host it via a third party project called Headscale but it is unofficial. (Although Tailscale does contribute to it)</p>

<h4 id="netbird">Netbird</h4>

<p>Netbird is similar to Tailscale but it has a much smaller learning curve since the GUI is used to configure everything. The company itself is both younger and smaller but because they are focusing on simplicity they have started growing in popularity. The target audience seems to be people who have less in depth knowledge about tech who want a simple to manage service. The Netbird server software is also fully open source/libre and self hostable so you can run it on your own hardware. The streamlines approach to services makes Netbird easier to work with even though they don’t have as many features or integrations as Tailscale.</p>

<h3 id="other-services-and-software">Other services and software</h3>

<h4 id="hyprspace">Hyprspace</h4>

<p>Hyprspace is a interesting project on Github which provides a overlay VPN service on top of the Libp2p framework. It isn’t really a fully developed product since it is a side project for the primary dev. The interesting part is that it relys on the decentralized nature of Libp2p so it doesn’t need a dedicated self hosted or public service to work. It doesn’t have the features of products like Tailscale/Netbird but it also seems to be fairly simple to set up. The downside is that the main dev seems to be set on Nix so the portablity of the service is less than ideal.</p>

<p><a href="https://github.com/hyprspace/hyprspace">https://github.com/hyprspace/hyprspace</a></p>

<h3 id="nebula">Nebula</h3>

<p>Nebula is a overlay VPN service started and used by Slack. It originally was a internal to Slack but in 2019 it was spun off into its own non profit. Slack still sponsors its development but anyone is free to use it. It doesn’t have a pubic instance or service but it is relitively simple to self host. One interesting thing about Nebula is that it doesn’t use Wireguard but instead roles its own networking as a part of the software. </p>

<h3 id="tinc">Tinc</h3>

<p>Tinc is a project from long ago which pioneered the concept of a overlay network. It was initally started in 1998 and provides a way for nodes to connect to each other even if a direct connection is not possible. Due to its simple design, Tinc is highly flexible. However, it lacks good security controls and is purely designed to be a basic network for other things to run on top of. It uses OpenSSL or LibreSSL instead of Wireguard since it predates the Wireguard protocol.</p>

<p>The major problem with Tinc is the state of the development. It has not seen much activity in recent years as interest in the project has slowly faded.</p>

<h3 id="netmaker">Netmaker</h3>

<p>Netmaker is a product that tries to compete in the same space as Netbird and Tailscale. However, it is overcomplex and and difficult to set up while not being all that competitive featurewise with larger services.</p>]]></content><author><name></name></author><category term="networking" /><category term="OverlayVPN" /><summary type="html"><![CDATA[What are Overlay VPNs?]]></summary></entry><entry><title type="html">IPv6 infodump</title><link href="http://localhost:4000/ipv6/networking/2025/10/24/ipv6-notes.html" rel="alternate" type="text/html" title="IPv6 infodump" /><published>2025-10-24T00:00:00-06:00</published><updated>2025-10-24T00:00:00-06:00</updated><id>http://localhost:4000/ipv6/networking/2025/10/24/ipv6-notes</id><content type="html" xml:base="http://localhost:4000/ipv6/networking/2025/10/24/ipv6-notes.html"><![CDATA[<h3 id="benefits">Benefits</h3>

<h4 id="huge-address-space">Huge address space</h4>

<p>IPv6 has an address space of 2^128 which is incredibly huge. It is so large that you could assign 2^16 addresses to every planet in the observable universe.</p>

<h4 id="no-fragmentation-and-no-broadcasts">No fragmentation and no broadcasts</h4>

<p>IPv6 routers do not fragment packets. Instead, they send back a ICMPv6 message packet too big. What this means in practice is that performance is greater and much more stable since MTU discovery is cleaner. IPv6 hosts can still fragment packets if needed and typically this happens when you try to transmit a large UDP packet. IPv6 also drops support for broadcasts in favor of multicast since it is much more efficient.</p>

<h4 id="simpler-subnetting">Simpler subnetting</h4>

<p>IPv6 subnets are always going to be a /64 which gives 2^64 addresses.  (referred to as a prefix) Having cleaner subnets leads to a network design that is much simpler since you can have effectively infinite devices on a single subnet. The secondary benefit of cleaner subnetting is quick identification of what subnet a IP is in since you only need to check the first half. For routers that have multiple subnets, you can assign something like /56 which contains multiple vlan assignable prefixes. This can be done manually or with DHCPv6 prefix delegation.</p>

<h4 id="better-routing">Better routing</h4>

<p>Because subnetting is simplified, routing becomes much easier. In IPv6 land it is best practice to assign a subnet which has multiple prefixes to geographical units such as buildings. This allows for routers to advertise a single route instead of having to advertise multiple smaller blocks. This can do done automatically with route summerization if you assign multiple /64s that are adjacent.</p>

<h4 id="auto-configuration-and-scalability">Auto configuration and scalability</h4>

<p>IPv6 has something called Stateless Address Auto-configuration (SLAAC) which allows for hosts to autoconfigure addresses. SLAAC works by first picking an address and then checking for conflicts via duplicate address detection. It then sends out a router solicitation (RS) and routers on the network reply with a Router advertizement (RA). This means that it is unnecessary to store state information like on DHCPv4. SLAAC and DHCPv6 also support revocation which means that a router or DHCPv6 server can withdraw an address. Additionally, IPv6 devices typically support tempoary addressing via SLAAC which improves privacy by generating a random public IP for web browsing. </p>

<h3 id="ipv6-nuts-and-bolts">IPv6 nuts and bolts</h3>

<h4 id="firewalls">Firewalls</h4>

<p>It is importaint to put IPv6 devices behind a Firewall to protect against attacks. Firewalls are stateful and will only allow traffic initiated by a IPv6 device inside the network. </p>

<h4 id="the-role-of-icmpv6">The role of ICMPv6</h4>

<p>ICMPv6 is very important since it allows for MTU discovery among other things. It is recommended that firewalls are configured to allow all ICMPv6 traffic since routers along a IPv6 path may send ICMPv6 messages back to a host. If ping scans are a concern it is possible to just block ICMP echo requests inbound.</p>

<h4 id="slaac-and-security-logging">SLAAC and security logging</h4>

<p>Some security profesionals are concerned about SLAAC since it can potenically reduce visiblity. If this is a concern the recommended action is to log Duplicate Address Detection (DAD) packets and the associated MAC addresses since IPv6 devices will send out DAD packets before using an address. On switches port security settings can be configured to only allow use of an address after Dad completes.</p>

<h4 id="creating-memorable-ipv6-addresses">Creating memorable IPv6 addresses</h4>

<p>IPv6 addresses can be composted of anything including building numbers and 4 letter words (that have a-f). To make network design simplier you can use addresses like 2605:bc80:3010:600:dead:beef:cafe:fed9 where the building might be 600 and dead:beef:cafe:fed9 would be the device in question. Ideally you should use DNS since it will always be simplier and easier to remember.</p>

<p>IPv6 address notation also allows eliminating leading zeros for each nibble of the address. (Instead of :004 it would be :4) Another way addresses are shortened by eliminating a group of nibbles that have all zeros. You can write something like 2006:44::1 instead of 2006:44:0:0:0:0:0:1. Keep in mind the rule only applies once per address so you can’t do something like 2006:44::3::1.</p>

<h4 id="ipv6-prefix-delegation">IPv6 prefix delegation</h4>

<p>IPv6 supports something called IPv6 prefix delegation which is similar to DHCPv6 but allows for upsteam devices to delegate IPv6 prefixes to downstream devices. A downstream device can request a prefix such as a /56 and after negotation a route can be created that maps a prefix to a device. This allows for highly efficient network design since it minimizes the need for manually configuration.</p>

<h3 id="ipv6-transition-mechanisms">IPv6 transition mechanisms</h3>

<h4 id="nat64">NAT64</h4>

<p>NAT46/NAT64 takes IPv4 packets as input, converts them to IPv6 packets and then converts them back on the edge. The idea is to do IPv6 only where possible so that you don’t need to run dual stack. The way it works is by adding a prefix to a raw IPv4 address so that it becomes a IPv6 address. That prefix is then routed to the NAT64 devices which the converts it back to IPv4.</p>

<h4 id="464xlat">464xlat</h4>

<p>464xlat allows devices to autoconfigure NAT46 with a NAT64 prefix. Devices can learn the prefix via SLAAC, DHCPv6 or DNS and once it is detected a built in NAT46 kicks in and translates IPv4 coming from applications to IPv6. From the perspective of the application it has native IPv4 but in reality it is converted along the path. For this to work a device needs a CLAT (Customer Edge Translator) to be built into the software. Google and Apple devices have this built in but Windows only supports this on WWAN networks. For Linux you need to install CLATD since support for 464xlat is typically not included by default. </p>

<h4 id="map-t">MAP-T</h4>

<p>MAP-T is simular to 464xlat but is designed for large ISPs. The way it works is that it assigns an IP and port range for a consumer wifi router device to use when doing NAT. This offloads NAT to consumer hardware which saves cost and reduces complexity for large internet providers. It is typically better supported than 464xlat on consumer equipment and is in use at some very large ISPs. However, it has less of a usecase outside of traditional ISPs since it is focused on consumer hardware.</p>

<h4 id="dns64">DNS64</h4>

<p>DNS64 takes a very different appoach to IPv4 compatiblity. Instead of translating IPv4 raw addresses it replaces IPv4 DNS records with IPv6 ones. The converted records point to a translation device that converts IPv6 traffic back to IPv4. This does not work with DNSSEC or IP literals but it does work for services that only use DNS.</p>]]></content><author><name></name></author><category term="IPv6" /><category term="networking" /><summary type="html"><![CDATA[Benefits]]></summary></entry><entry><title type="html">OpenSSL Certificate resources</title><link href="http://localhost:4000/openssl/certificates/2025/08/20/openssl-cert.html" rel="alternate" type="text/html" title="OpenSSL Certificate resources" /><published>2025-08-20T00:00:00-06:00</published><updated>2025-08-20T00:00:00-06:00</updated><id>http://localhost:4000/openssl/certificates/2025/08/20/openssl-cert</id><content type="html" xml:base="http://localhost:4000/openssl/certificates/2025/08/20/openssl-cert.html"><![CDATA[<p><a href="https://docs.openssl.org/3.5/man1/">https://docs.openssl.org/3.5/man1/</a></p>

<p><a href="https://www.golinuxcloud.com/add-x509-extensions-to-certificate-openssl/">https://www.golinuxcloud.com/add-x509-extensions-to-certificate-openssl/</a></p>

<p><a href="https://systemoverlord.com/2020/06/14/private-ca-with-x-509-name-constraints.html">https://systemoverlord.com/2020/06/14/private-ca-with-x-509-name-constraints.html</a></p>

<p><a href="https://www.youtube.com/watch?v=StTKqLeJ7Ms">https://www.youtube.com/watch?v=StTKqLeJ7Ms</a></p>]]></content><author><name></name></author><category term="OpenSSL" /><category term="Certificates" /><summary type="html"><![CDATA[https://docs.openssl.org/3.5/man1/]]></summary></entry></feed>